Saturday, September 21, 2013

Wingin It Lacquer Swatches and Review

Hello and Welcome!!!!!
 Its another rainy day here on my side of town. Gloomy but somewhat relaxing, a perfect day to play around with nail polish But isn't everyday? lol
Today I will be showing you some new lacquer colors from Wingin' It Lacquer. The polish is a 3 free hand mixed and handmade formula. 
**Disclaimer**I was sent this polish by Wingin' It Lacquer for reviewing purposes for my honest review and feedback.
***Note*** Some of the colors may not be posted in her shop. Check her Facebook page for further updates.
From left to right are the colors......
Fiona, Burning Leaves, Nice Uh.......Watermelons..
and Falling Leaves
This is Burning Leaves
It is Copper color with a lot of golden shimmer. This color is my absolute favorite. If this color doesn't say FALL I dont know what color does. This color is perfect..perfect for the Fall season. I applied 3 coats to make it completely opaque which is great. The formula was amazing and so easy to apply. This is one of her newest colors and as of right now I do not see it posted in her shop.

This is called Nice Uh.......Watermelons..
This is a perfectly Pink base with micro iridescent flakes. It truly is the perfect Pink. I did have to apply 4 coats to get it opaque. If it took less coating I would be in head over heals in love. I really like this shade cant you tell. Hahaha This also is a new color. I dont see this color in her shop yet so be sure to check out her Facebook page for details.

This is called Falling Leaves
Another PERFECT jelly glitter for the Fall season.
This glitter topper has a slight yellow tint to it and has red and orange flakes and hexes. It can be used by itself and it will have a sheer yellow color to it. You could apply a yellow base color to your nails then apply Falling Leaves over it if you prefer an opaque look. I applied 1 coat of Falling Leaves over 2 coats of Julep/Ingrid. This topper screams Fall don't it? This color puts me in the mood for Thanksgiving, Halloween ect. All I know is that Im ready to jump in some leaves. That may sound corny but Hey its true. Hahaha This is available to purchase and is listed. You can purchase this for $9.00

This color is called is Fiona
This is a light Green base with multiple colors and shaped glitter . I applied only 2 coats. This polish is a tad thick so a little goes along way. I also did have to use a top coat. I used G&G HK Girl top coat. This is not yet in Wingin' It Lacquer's shop.

With all that being said I couldn't be more ready Fall. Its almost here. Wahoo!!
Which colors were your favorite? I really loved Burning Leaves. Its such a beautiful color and so shiny.

Want to check up and check out these colors for yourself???

Wingin' It Lacquer Facebook Page HERE
Wingin' It Lacquer ESTY SHOP
Wingin' It Lacquer BIGCARTEL


Thank You For Reading!!!
Ya'll Come Back!!!
XOXO


Friday, September 20, 2013

How to use Nail Polish Stamping Templates

Hello And Welcome!!!
I do have to apologize first off for taking so long to write this How To. I have had Strep Throat and I finally went to the doc yesterday. They gave me a Penicillin shot to the bum and gave me some meds. I do feel alot better now and I am so excited to be back. Lets get started!!!!

First off I like to get all my supplies together 
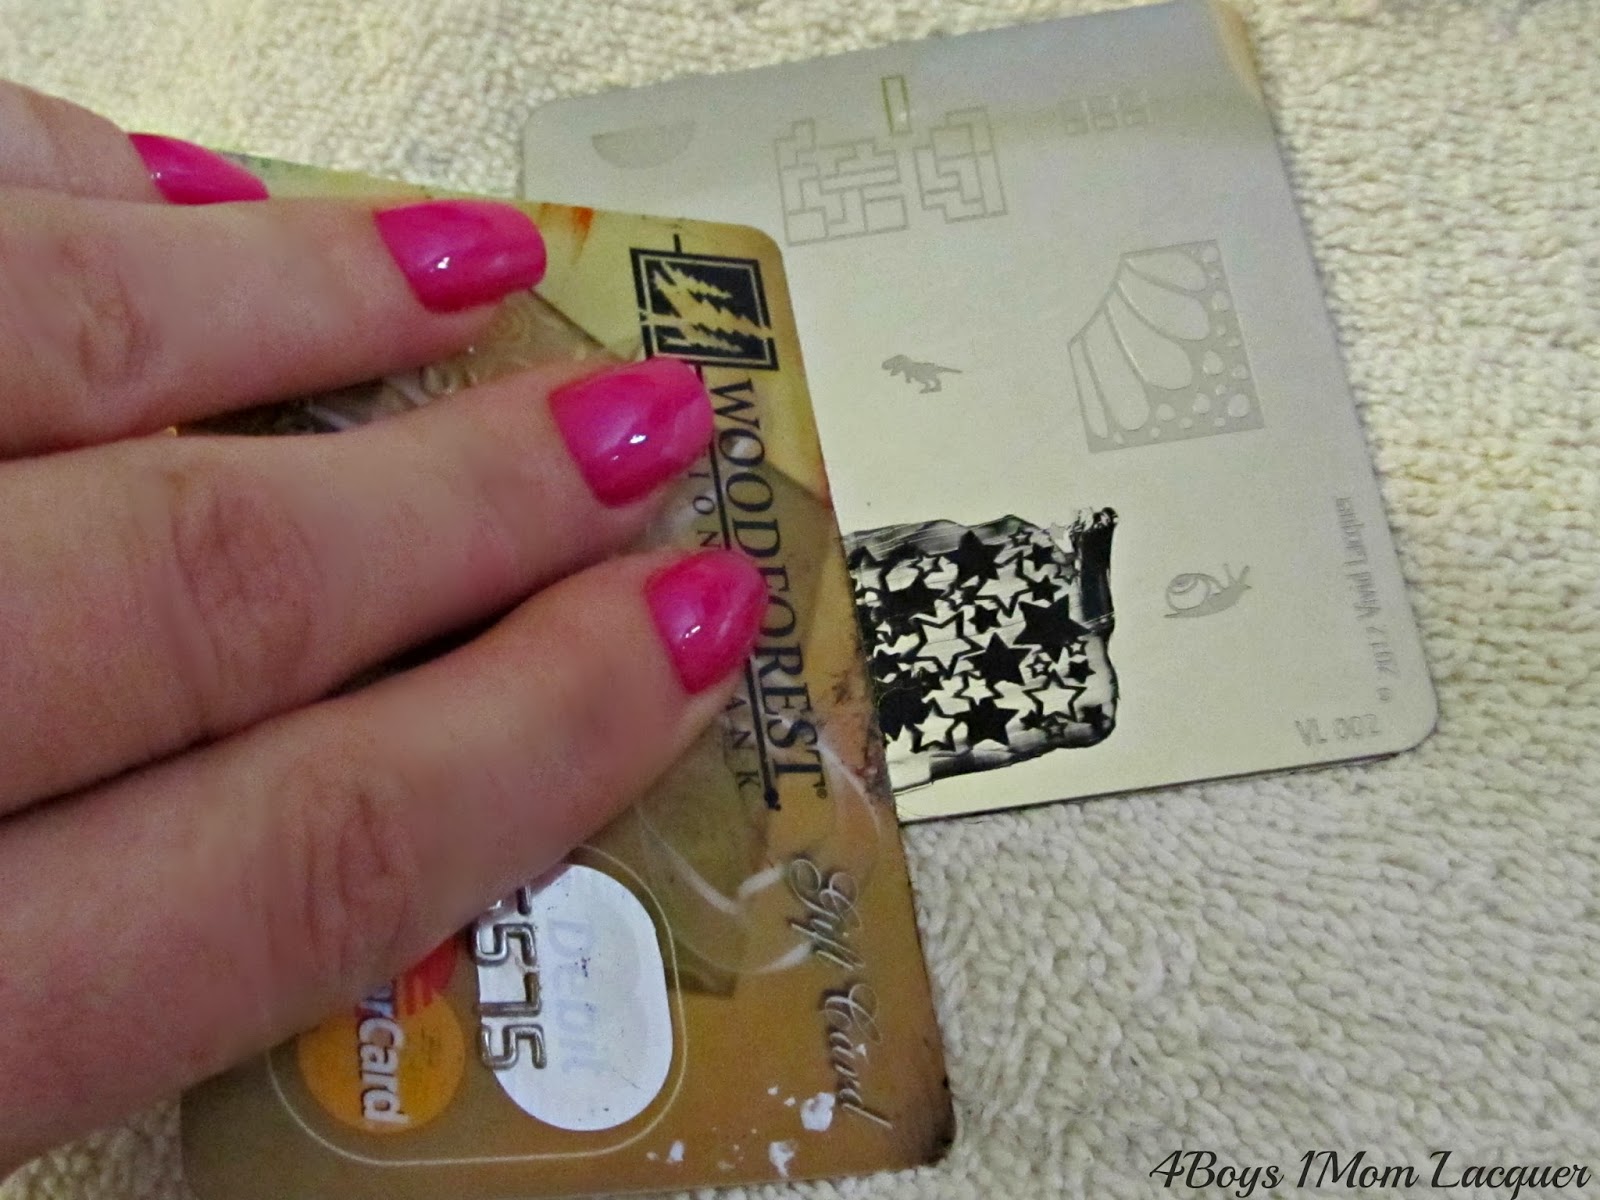
  1. Scrapper/Old Credit or gift card
  2. Angled brushes
  3. XL Stamper
  4. Stamping Template
  5. Bowl of acetone
  6. Old towel or paper towel
  7. Stamping polish
I prefer using an old Credit card because it scrapes much more evenly then the purchased scrapers I have. I also have an XL Stamper which makes applying a full design to your nail bed so much easier and its double ended. I purchased 3 sets of XL stampers for only $5.99 on Ebay HERE.I also use the angled nail art brushes to clean up the polish around my nails. They can be purchased HERE on Amazon for only $2.10 and that is for a whole set. Its a real good deal. I also use an old Ketchup cup to pour acetone in for easier access for cleanups. As for the Stamping Template, I used one that I purchased from Vivid Lacquer HERE. I also recommend purchasing Cheeky plates, they work amazing with all sized nail beds also. You can purchase them on Amazon HERE or purchase them through Cheeky's website HERE. Now lets begin.....

First you need to apply your base color.
I decided to go with China Glaze/Purple Panic
Let that dry. I also like to apply my favorite top coat called 
G&G HK Girl it's a Super Shiny, Fast Drying Top Coat. You can purchase it HERE. It dries super fast and has a very shiny finish.
Now you want to get your plate and apply your stamping polish over the image you want. I used Konad Black stamping polish.
Grab your scrapper/Credit/Gift card and gently scrape the access polish to the side of your towel or paper towel. 
Quickly and gently press your stamper onto the image to pick it up.
Now QUICKLY apply the image to you nails starting from the very side of your nail and gently roll it on. No need to press hard. If you press hard when applying the image you could risk the image separating/ripping.
To clean the access polish off your stamper you can use a cotton ball with acetone or those sticky lint removers.
This is what the finished results will look like before you clean up. Don't worry this is completely normal.This is when your bowl of acetone and your angled nail art brushes come in to save the day. Just dip your brush in the acetone a dab it on your towel and start to clean up around your nail beds.
This is what my brushes look like. My old one on the Left. My new on the right

Your going to want to let that stamping polish dry for a bit before you apply your topcoat. Your topcoat can make it smear.
And now....The Finishing results.....


I hope you enjoyed the step by step process. Its not that bad but practice makes perfect so try and not give up. It becomes alot of fun once you get the hang. I cant wait to see your designs and I hope you share them with me as well. If you have any questions feel free to ask!

Thank you for reading!!!!
Ya'll Come Back!!!
XOXO


Sunday, September 15, 2013

Daphine Polish "Sleppy Hollow Trio" Review

Hello and  Welcome!!!
*Disclaimer* I was sent these products from Daphine Polish for reviewing purposes and was not purchased by me.

Are you ready for Halloween? Well... it is almost here and it's almost time to start decorating those pretties of yours. If you are having trouble finding that perfect polish for Halloween don't fret I have 3 to show you today from Daphine Polish and this trio has a history behind them that connects the creator/owner Joanne of Daphine Polish to it. This spooky trio is called..The Sleepy Hollow Trio.
****This trio is not yet available it will be released Sunday September,22.****
What connects Joanne of Daphine Polish to the Sleepy Hollow Legend is that she spent most of her childhood in Westchester County in which Sleepy Hallow is located,so she grew up hearing about the tale. Very mind blowing right?
Now I bet your itching to see what polish she created. Lets take a look shall we......
From Left to right we have....Katrina Van Tassel, The Hessian, and Icabod from Connecticut
"The Hessian"
“It is said by some to be the ghost of a Hessian trooper, whose head has been carried away by a cannon-ball, in some nameless battle during the Revolutionary War, and who is ever and anon seen by the country folk hurrying along in the gloom of night, as if on the wings of the wind.” 
This is The Hessian
It is a stunning Black holographic jelly polish with red sparkle.I just applied 2 coats to make it opaque. The formula is amazing. It applied with no problems at all. This color is my favorite out of the trio. I also applied a topcoat.

 "Ichabod"
To see him striding along the profile of a hill on a windy day, with his clothes bagging and fluttering about him, one might have mistaken him for the genius of famine descending upon the earth, or some scarecrow eloped from a cornfield.” 
This glitter topper is called Ichabod from Connecticut
This is absolutely beautiful.This has the perfect colors for Halloween. It has a mixture of neon green, silver, orange and grey glitter. It's Halloween in a bottle!
I applied one coat of Ichabod from Connecticut over 2 coats of The Hessian.

"Katrina Van Tassel"
“She was a blooming lass of fresh eighteen; plump as a partridge; ripe and melting and rosy-cheeked as one of her father’s peaches, and universally famed, not merely for her beauty, but her vast expectations.” 
This is Katrina Van Tassel
This is a lovely purple holographic polish with a red shift.It takes 3 coats to get it completely opaque which is not a problem for me at all. Do you see how beautiful this color is?? Stunning!

I was uber excited to review this trio. I love the story behind it, I love the colors and I think Joanne growing up where Sleppy Hollow originated makes it 100 times more amazing . A story behind polish is always a bonus for me. I truly had fun with the Sleepy Hollow Trio!!! I know you will too!

***Daphine Polish Info*****

****REMINDER****
****This trio is not yet available it will be released Sunday September,22.****

Thank you for reading!!
Ya'll Come Back!!


Tuesday, September 10, 2013

Sweet Heart Polish

Hello and Welcome!!!
Is it Friday yet?? This has been a slow week but a very busy one at that. Im sure we all are waiting for Friday to show its face. With that being said I have some pretties to show you that will keep you occupied for the time being. Have you heard of Sweet Heart Polish? I will be showing you 2 polishes that I received from Sweet Heart Polish.The polish she makes has a five free base. She sent me them for reviewing purposes and to enjoy of course. I did not purchase the items and these are my opinions of the products and was not coached what to say in any way.
Lets take a look!
We have from left to right..... Star Bright and Iceland
This is Iceland
This is Forest Green base with Gold shimmer mixed through out the formula. This took 3 coats to get it completely opaque . Iceland can be purchased for $9.00 and its 16.5ml.
This polish went on smooth. Be sure to roll or shake this polish to mix the gold shimmer evenly in with the polish. The gold shimmer glitter does sink to the bottom so shake or roll.I also topped it off with HK Girl Top coat.
As you can see I did a little something different to my ring finger. I applied many jewels and nail art studs just to change it up a bit.

This glitter topper is called ...Star Bright
This is a clear base with Neon Pink,Green and also White stars with small blue specks of glitter along with micro neon yellow/green glitter. This can be purchased for $9.00 for a 16.5ml bottle.
This glitter was a little difficult to get out.. I had to fish around for the stars. Be sure to roll this polish to help the stars to the top other than that it applied fine. I applied 1 coat of Star Bright over 2 coats of LVX/Cliquote. I love the assorted neon stars. This is a beautiful glitter topper  and looks great over nudes or Darker colors like black red ect. 
I really enjoy using Sweet Heart Polish. I love the color Iceland. That polish is GEORGEOUS! That is my one of my favorite polish's. Sweet Heart Polish also has great costumer service.

To contact her you can email her at this address
sweetheartpolish@gmail.com or message her Via Facebook page.

You can purchase this polish from.......
Sweet Heart Polish's Esty Shop HERE
Follow Sweet Heart Polish on Facebook HERE

Thank you for reading!!!
Ya'll Come Back!
XOXO


Sunday, September 8, 2013

Camo & Guns Nail Art

Hello and Welcome!!!
I did a mani over the weekend and I promised to write about it to show you what I used and where things were purchased. This mani I have done did not take long at all and was very simple. I love Camo and Guns and could not wait to get all my plates delivered to my home so I can create the look. I love to go hunting and go mudding and all that dirty, outdoors stuff. This girl can get down.....lol 
The mani I created is called the Camo & Guns Mani. I posted it on my Facebook page before writing about it. Lets take a look.
To create this look I used......
  • SinfulColors/Beau Khaki
  • Julep/Pippa
  • Mundo de Unas/Peach stamping polish
  • Konad/Black stamping polish
  • Butter London Matte Finish top coat
  • Vivid Lacquer(VL)polish template/010/ $8.00 each
  • Fab Ur Nails polish template/Fun 4/ $18.00 each

What I did first was paint every finger except my ring finger with 1 coat of SinfulColors/Beau Khaki,then using the Vivid Lacquer plate and the camo design I applied the Mundo de Unas/Peach stamping polish and stamped it onto all my nails excluding the ring finger.
For my ring finger I used Julep/Pippa as the base color then using the Fab Ur Nails plate and the gun design I applied Black Konad stamping polish to the plate and used my stamper to apply the gun design onto my nails. Lastly I applied the Butter London Matte Finish Top Coat.
These plates are very good quality and stamped without issue. The images are great quality also.
And That is That!! That is how this awesome mani was created.
I will post the links below on where you can purchase the Nail Polish Templates(Plates).

Fab Ur Nails Plates at Llarowe shop HERE
Fab Ur Nails Order Form HERE
Vivid Lacquer Esty Shop HERE

***Note when ordering Fab Ur Nails plates.... I found it alot cheaper for shipping being in the US to order from Llaroew's shop***

All of the supplies were purchased by me .

Thank you for reading!!
Ya'll Come Back XOXO!!


Thursday, September 5, 2013

LVX 2013 Fall Collection

Hello and Welcome!! 
Today I have a special collection of polish to share with you.
 It is the LVX 2013 Fall Collection. This collection of lacquer is based on the Spring 2013 Runway Fashion Color Trends. This collection is gorgeous, fabulous and is definitely the perfect colors for the Fall. Who's ready to see a bunch of awesomeness? Lets take a look.
There is 6 beautiful colors in the LVX 2013 Fall Collection.
They are 15ml and can be purchased for $16.00 each
This color is called Relique.
This color is a bold Taupe. It seems to be a grey with a bit of a lavender tent to it. This color went on smoothly and was opaque in 2 coats. A top coat is not needed for shine but if you prefer to add a top coat to make your polish last then that's ok.

This color is called Azzurrum
It is a Navy Blue crelly, its this seasons alternative to Black. This is a very beautiful color. It went on so smooth and I applied only 1 coat in the photo above. I just love 1 coaters and was happy this color turned out so stunning.Its such a rich color, perfect for the Fall.

This color is called Cashmere
This is a muted grey but looks more like an almond color. I applied 2 coats to get it completely opaque. It was nor streaky whatsoever.  

This color is called Viridis
This is a deep Emerald color. So stunning and has a natural glossiness to it. I applied 2 coats to get it opaque. 

This color is called Cliquot
This is a Coral color with soft Peach undertones. This color is very feminine and might be considered a nude depending on your skin-tone. I applied 2 coats to get it opaque. Its a very creamy polish.

This is called Dahlia
This is both a powerful and feminine color. It is a deep Blackish Red crelly and it could stain your nails so to be safe be sure to use your favorite base coat. I applied 2 coats to get it opaque but a third may be needed depending on your taste.

These caps on the bottles are a little different. To use just simply pull the cap off and then open and apply. This collection is now available.

What do you like most about this collection? Have you tried any of the 2013 Fall Collections colors yet?


Shop LVX HERE
LVX Facebook HERE 

I hope you enjoyed all the beautiful colors and thank you for reading!!!
Ya'll Come Back!!